Teensy GPS Logger
Update 28/08/15, New version more light:
*The last and final design, the Teensy and GPS is directly powered from 3.7v li-on batt, 20 hours 5hz logging, 39g heights with IP4 box.
Update 23/07/15, New firmware, feature added:
*Logging data only when the speed is above 3 km/h
*Using var usb_configuration; to detect and enable charging automatically when the board is plugged on a computer (only pc, not Ac adapter).
Update 12/02/15, I have rewrite the sketch:
– The sketch is more clear, light and compact, 3.76ko from 5.07ko comparing old sketch.
– Use TinyGPS lib, so you can select what we want to log.
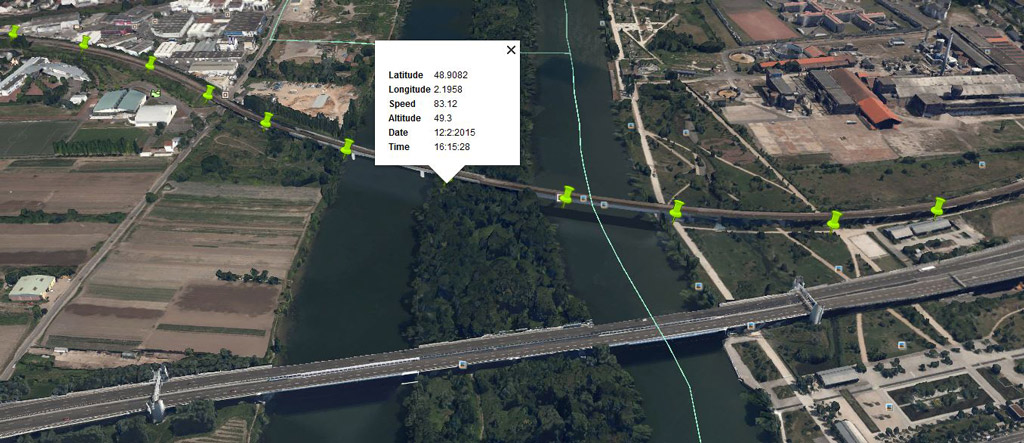
– Create a .CSV file directly, you can use import function from GoogleEarth PRO (good news, Google has released it for FREE right now).
The goal
In the past two years, i have released two version of GPS logger, with a lot of default like, poor autonomy, need to take off the sdcard to get the log, no function to upgrade the code easily, by the way, i have redesigned a new version with a lot of news feature, see bellow.
– Better autonomy.
– Be lightweight and wearable.
– Be rechargeable easily.
– Got log directly from USB.
– Upgrade code via IDE Arduino through USB.
– Future options implemented for improvement.
– Water Resistant IP4.
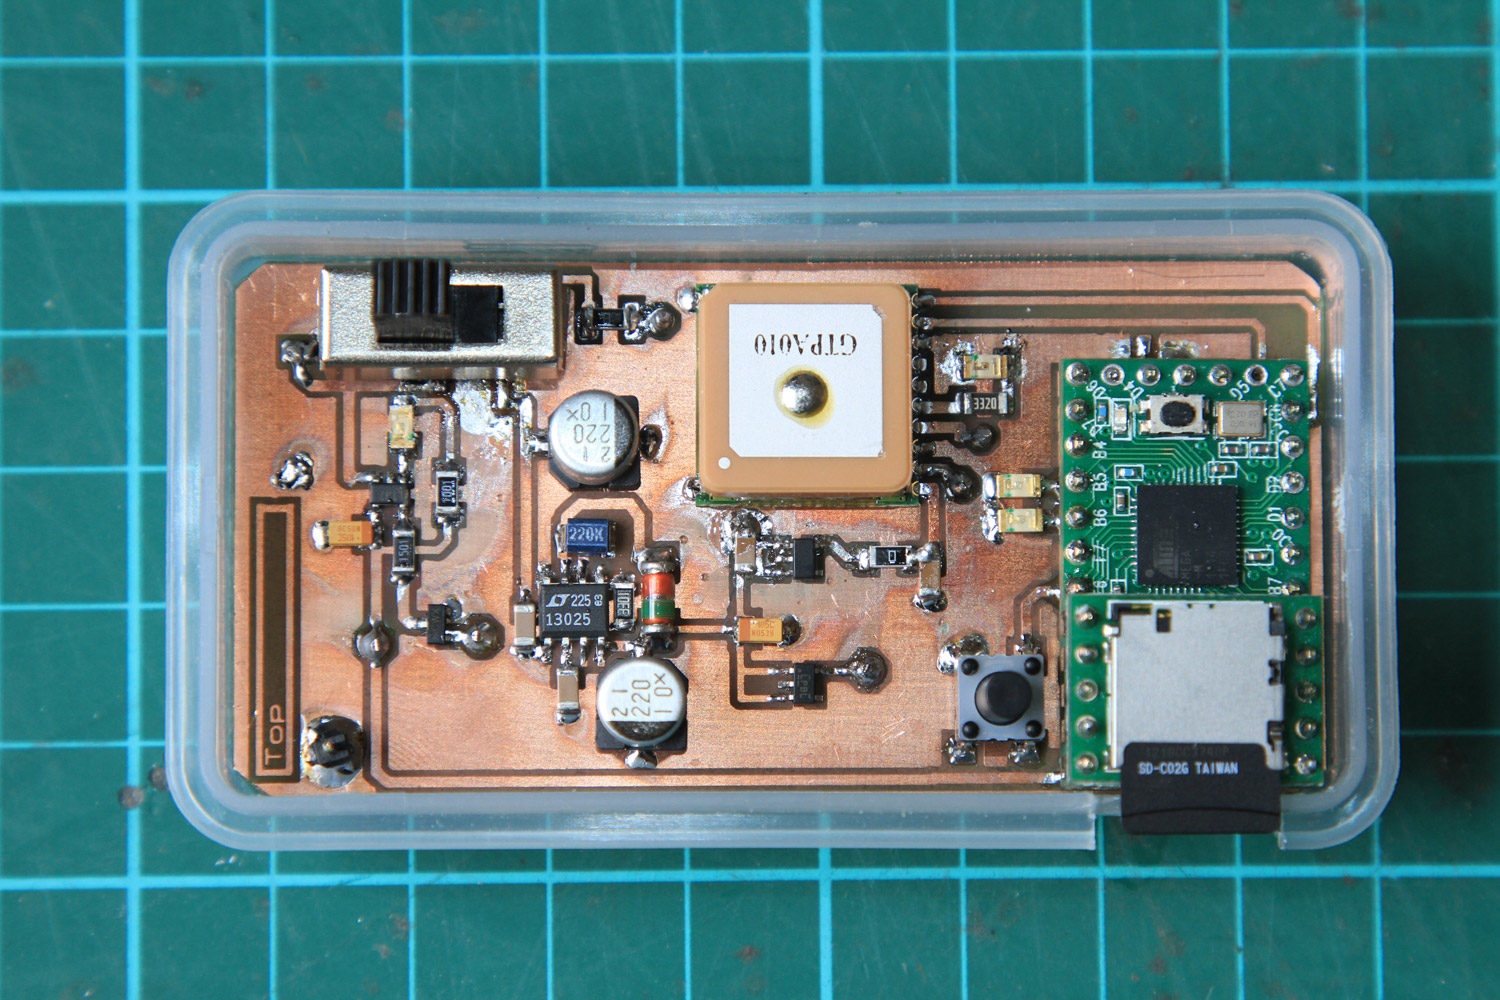
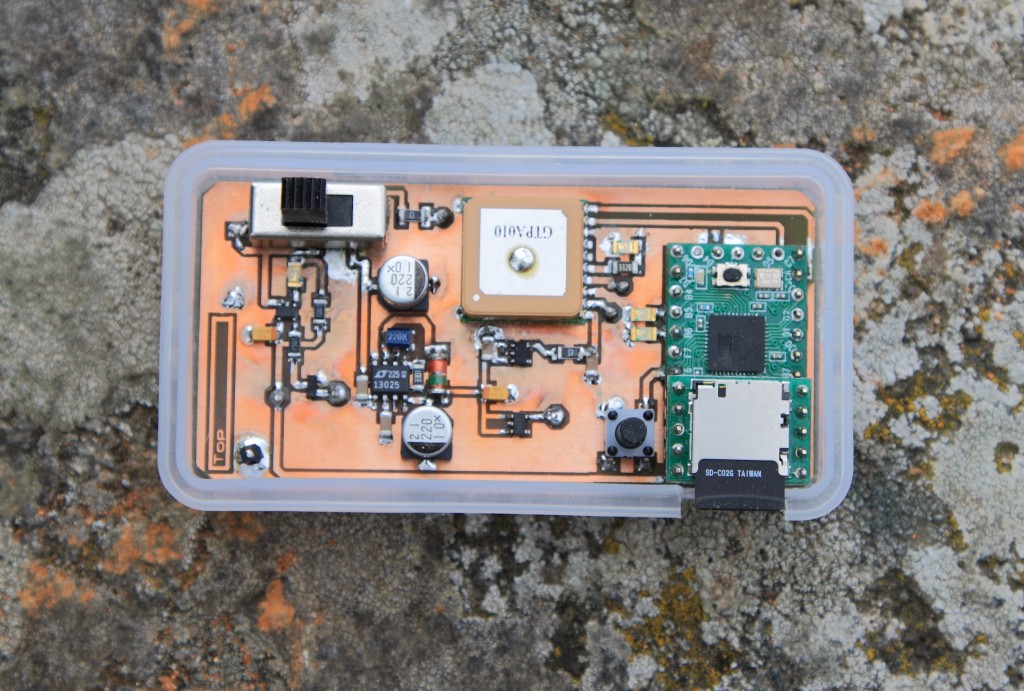
Hardware
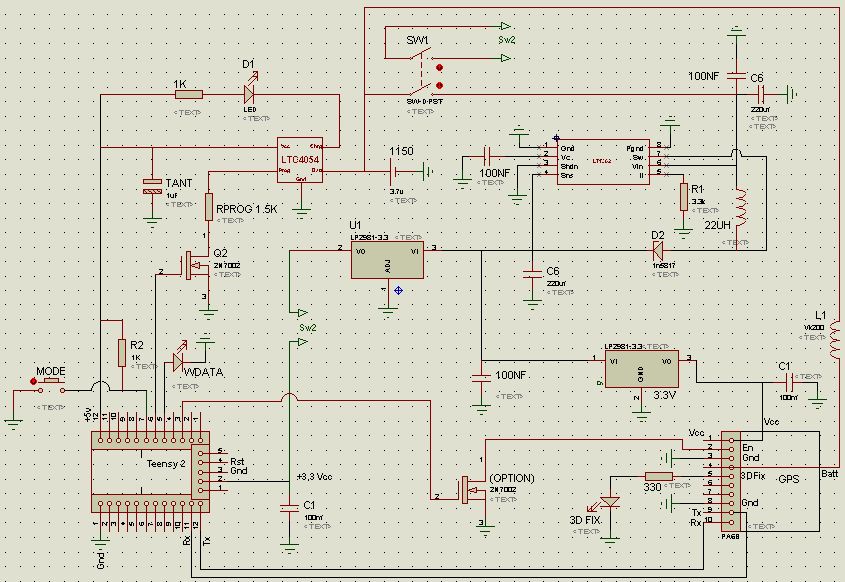
– µC Section
The hardware run around a Teensy 2 this very small board run with a ATMEGA32U4 8bit AVR 16 MHz Processor, 25 I/O.
– GPS Section
The GPS NMEA sentences comes from a PA6B module, i choose this because he is very sensitive and small, better than EM406. The MTK Command Packet can be found here.
Issue encountered: On the first board prototyp i have mounted a PA6B without problem, when i powered up the pcb for the first time the GPS try to lock to satellite, in this case the 3d fix output should continuously output one-second high-level with one-second low-level signal, in theorical, regarding the data sheet, when the GPS is locked on the satellite, the output pin should continuously output low-level signal, but in my case, the output give me a high level signal, probably du to the firmware, so i decided to re-upgrade with the default factory firmware, the software, firmware, and guideline are available here. Be careful, the factory firmware set the baud rate to 9600bps, not 4800.
Batteries backup
To ensure fast hot start, the batteries pin is connected directly to the li-ion batt, the receiver has valid time, position, almanac, and ephemeris data, enabling a rapid acquisition of satellite signals.The voltage should be kept between 2.0V~4.3V. So, its OK.
– Power Section
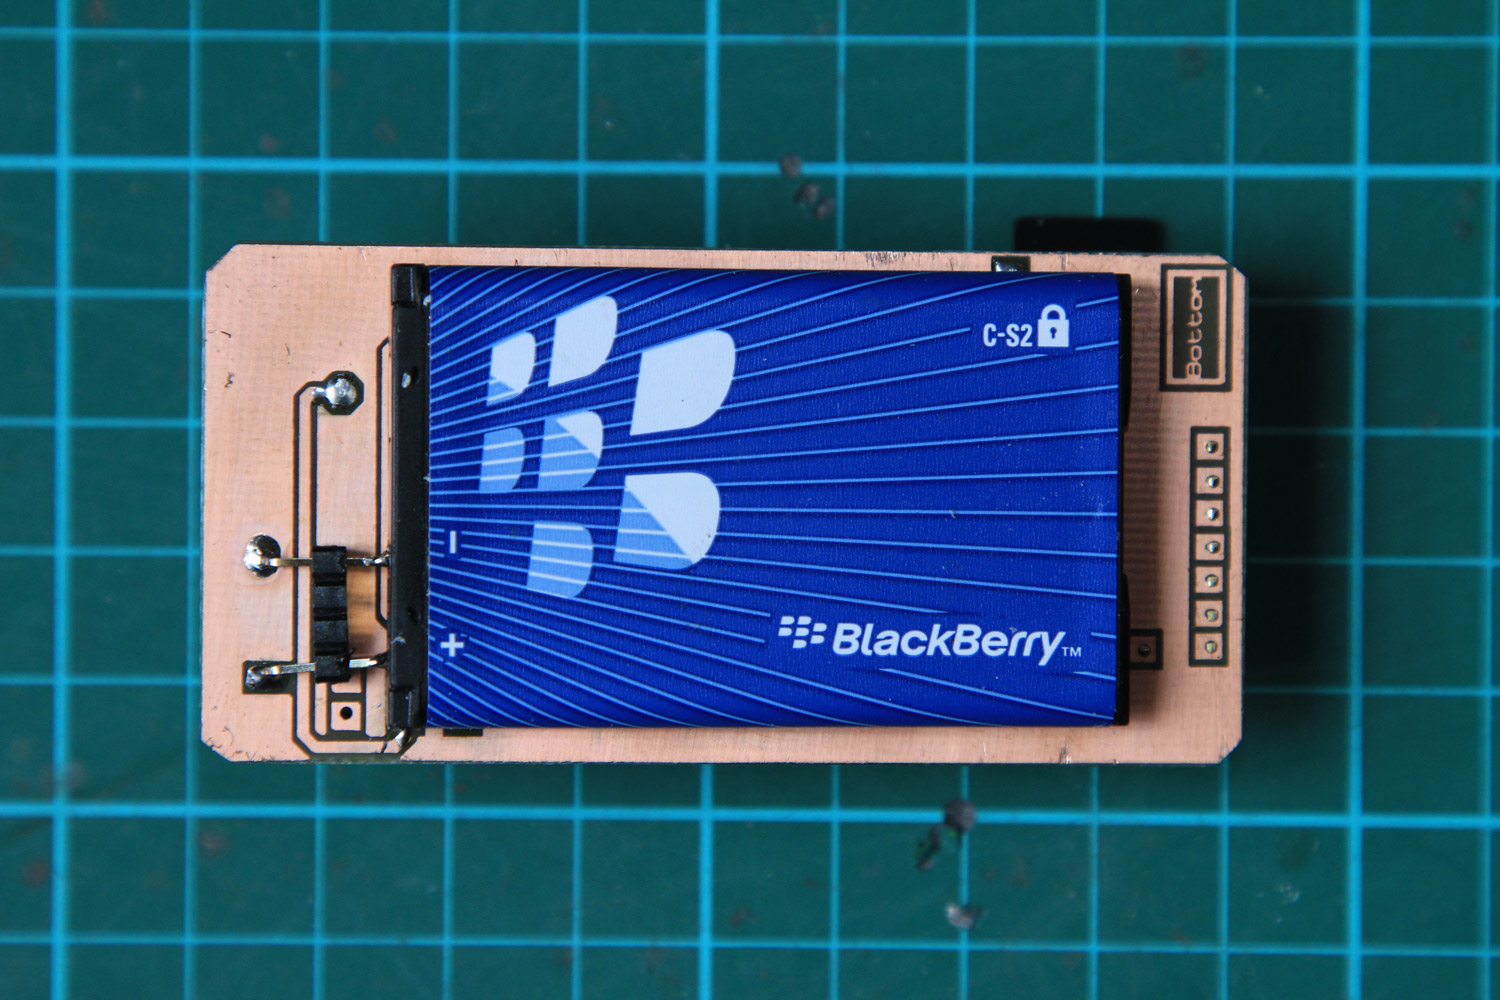
The power come from a BlackBerry batteries (1100mha in this case), a charge pump, DC/DC converter (LT1302) give 5v/600ma from the 3,7v batt, available in SOIC-8 package, it’s a very powerful converter and can start as low as 2v. Two LP2981 give two separate 3,3v power line for the GPS and Teensy.
– Charging the Batt
Power charging is assumed via a LTC4054-4.2 a standalone Li-Ion Battery Charger with Thermal Regulation in ThinSOT package, the charging current is set with a simple resistor, i found 1,5k good value for around 1h30 of charge, the charge control is drive thought a N Channel MOSFET (2n7002) the signal come from the Teensy, just plug the USB cable and push the button to turn the PIN 17 High. Another option, is play with a « usb_configured » variable inside Teensy’s USB code which indicates if the PC has configured the USB device. Accessing that variable is the best way to know if a PC is connected to Teensy. But its not implemented yet.
The code
Original code come from Adafruit, and it run on Teensy with some majors modification.
I have removed unused libraries like avr/sleep.h, and GPSconfig.h header, the SoftwareSerial.h, NewSoftSerial.h libraries was replaced by <AltSoftSerial.h> for better performance. More informations are available in the commented sketch.
Loading the code
- First, download and install Teensyduino software and libraries, complete instruction are here.
- Download and unpack AltSoftSerial Library to /libraries directories.
- Run Arduino 1.0 and load the code.
- Select Teensy 2.0 in the tool menu.
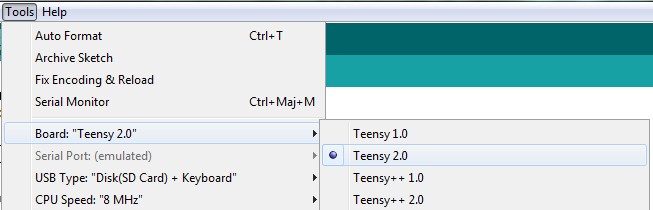
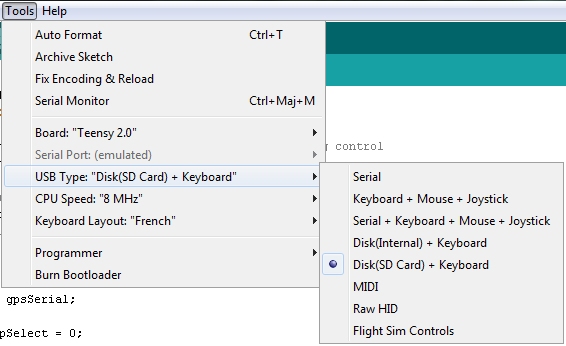
- Select USB Type Disk SD Card + Keyboard
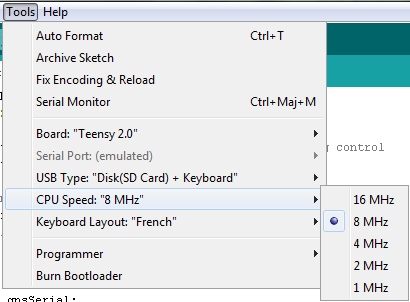
- Finnaly, select CPU Speed to 8Mhz
Option
A « N Channel MOSFET » (2n7002) is connected to the Enable pin of GPS, in case of you need to drive the GPS. In normal operation keep Enable Pin floated or connected to Vcc.
Power saving method
Since is a embedded project, for better batteries life, we need to run with a maximum save of power, some good way:
– Run Teensy and GPS with 3,3v power supply.
– Lowering the clock speed at 8Mhz.
– Write GPS data only every 5 seconds, in hiking we no need very accuracy in fact.
– The data is stored only when the GPS give valid fix.
– Disabling the « Analog to Digital Converter ».
With this power measure, we can switch from 27.3 mA power consumption to only 10.6 mA
The total power of TeenLogger is around 45ma with GPS satellite tracking, and give around 15/17 hours of complete logging.
The data
The data is logged into a txt file, (GPSLOG0x.txt) you can easily convert this file directly into a KML format with, NMEA to KMZ file converter, or use gpsvisualizer.com and everytrail.com
Design
Resources
Global Positioning System
NMEA sentence information
Teensy Board
Arduino sketch v2
Arduino Sketch (not recommended)
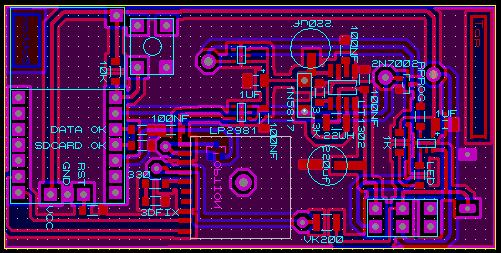
TeenLogger Shematic (PROTEUS File)
TeenLogger Layout (PROTEUS File)
[…] SD card slot on the lower right, and the slide switch on the upper left. This minuscule module is an all-in-one GPS logger which [J3tstream] […]
[…] slot on the lower right, and the slide switch on the upper left. This minuscule module is an all-in-one GPS logger which [J3tstream] […]
[…] SD card slot on the lower right, and the slide switch on the upper left. This minuscule module is an all-in-one GPS logger which [J3tstream] […]
Nice work!
[…] SD card slot on the lower right, and the slide switch on the upper left. This minuscule module is an all-in-one GPS logger which [J3tstream] […]
[…] SD card slot on the lower right, and the slide switch on the upper left. This minuscule module is an all-in-one GPS logger which [J3tstream] […]
[…] he goalIn the past two years, i have released two version of GPS logger, with a lot of default like, poor autonomy, need to take off the sdcard to get the log, no function to upgrade the code easily, by the way, i have redesigned a new version with a lot of news feature, see bellow.- Better autonomy.- Be lightweight and portable.- Be rechargeable easily.- Got log directly from USB.- Upgrade code via IDE Arduino through USB.- Future options implemented for improvement.- Many more … […]
Perfect job! 🙂
hmmm, add wifi? :p
i plan to send data trough air*interface
Nice design! Love it! How did you manage to solder the header on the top layer of the board? Is there any space between the header and the board? If I have seen it correctly the header is through hole while the pins are not connected on the bottom layer, they are connected on the top layer… 😉 Wonder how you managed that!
the answer is here http://www.pjrc.com/store/sd_adaptor.jpg
but you right, the header do not « touch » the main board…
Cool! Thank you very much… 😉 Cool solutions. It is easier to do if you want a single sided PCB for example 😉 Then you have a smaller end result. Thank you for the reply and the picture!
Arlictes like this just make me want to visit your website even more.
Cool project! I’ve done something similar using the 328P and GPS module from Adafruit. The projects been in the works for over a year now. I like how your implemented low power tricks to get longer life out of your batteries. Something I’m far from attempting yet. http://youtu.be/GKC5QPpWtfU
Nice job Mike, thanks for the share.
I have modified your sketch and idea for use with the cheap U-blox PCI-5S. First thing it seems like you have RX and TX reverse on the schematic.
Second, I want to make it log faster, for use in tracking RC planes and bicycle riding. I have tried many things but cannot get it to work. I thought I could just shorten the Delay after bufferidx++; but that doesnt seem to work.
Some times it randomly doesnt send $GPRMC data anymore.
If you have any ideas please let me know,
Here is my code:
https://gist.github.com/dwhacks/6481412
thank you!
Hello Dayne, sorry for the delay i was in vacation, far away from Internet connection
for better performance i think you need to test with the UART lib http://www.pjrc.com/teensy/td_uart.html
to be honest i never got very good performance with AltSoftSerial.h , some thing appears to interfere
Hello again! I have decided to purchace the MTK module from adafruit for better performance. (https://www.adafruit.com/products/790). Now reading the command set sheet I have looked to change it to 10hz update and a higher baud rate. The problem is, default baud is 9600 so I have « Uart.begin(9600) » but then its obviously stuck at 9600. If I try to start uart at 115200 then the module doesnt seem to read the commands I send it. Do you have any ideas?
try to
1) set at 9600
2) send your 10hz command
3) set at 115200
Great project, I am wanting to build one, has it proven to be reliable logging data?
I’m wondering how hard it is to the dual layer board?
Thanks ian
Hi Ian,
I use it since one year, for hiking, i haven’t any problems to read the data
the dual board is not hard, also you have the shematic you can draw your own pcb with your favorit pcb software
Hello, how the transfer from SD works? I haven;t got Teensy to check – does it support mass storage or what? Thanks for answering this. I’m thinking about the same logger, but with LiFePo accu – stable ~3V with no need of buck-boost converter (accu -> 5V -> 3,3V). At the very moment, I have the direct output to GPX programmed, so it’s quite easy to import data to Endomondo 🙂
yes with mass storage (lib integrated with arduino/teensy pack) look for » Disk(SD Card)+Keyboard »

Update 12/02, I have rewrite the sketch:
– The sketch is more clear, light and compact, 3.76ko from 5.07ko comparing old sketch.
– Use TinyGPS lib, so you can select what we want to log.
– Create a .CSV file directly, you can use import function from GoogleEarth PRO (good news, Google has released it for FREE right now).
Look the top of the article
[…] project: http://www.f4huy.fr/?p=39 Arduino code and pcb layout (ARES) available. Load the sketch with CPU Speed 8Mhz under Arduino […]